The port of St Nazaire in Brittany is a large port in Europe, situated six miles upstream from the mouth of the River Loire. It was of paramount importance to the German war machine in the Second World War as Kriegsmarine warships could be brought into the dock, it was even able to accommodate the massive Tirpitz and her sister ship, the Bismarck which were to be serviced and repaired there when required.
With the Battle if the Atlantic raging, The Allies recognised the benefit of disabling the port but an aerial bombardment could well result in heavy French civilian casualties so the possibility of mounting a raid by sea to destroy the dock and harbour installations was suggested.
Lieutenant Colonel A C Newman of No 2 Commando planned the attack. The objectives were to destroy the dry dock (known as Forme Ecluse), its pumping stations and the nearby U-boat pens. The main force would consist of 100 men from No 2 Commando, to attack gun positions and provide cover for demolition parties drawn from 1, 3, 4, 5, 9 and 12 Commando. The gates of the dock were to be rammed by a destroyer packed with explosives and carrying part of the landing force, while the rest would disembark from Motor Launches. When their tasks were complete, the commando parties would muster at The Old Mole, re-embark on the Motor Launches and head out to sea. Lt Col Newman would command the landing parties and Commander R E D (Red) Ryder, the Naval operation.
St Nazaire was a large town in 1942, its population exceeded 50,000. A large German military garrison was based there manning searchlights, coastal batteries and maintaining security for the ships and submarines moored in the harbour. The planned raid would be bloody and perilous and the chances of success and escape were slim.
On 6 February 1942, Lord Louis Mountbatten submitted the plan and it was approved by the Chiefs of Staff on 3 March. Codenamed Chariot, the raid would take place within the month.
An old US Destroyer given to Britain in exchange for land in Bermuda, the USS Buchanan was re-named HMS Campbeltown, and prepared for the attack. She was stripped of as much equipment as possible to allow for the great quantity of explosive to be packed into the bow, and two of her four funnels were removed so she resembled a German Möwe class frigate. Steel bulwarks were custom made and welded across the decks to protect the Commandos on board when the gates were rammed.
Training soon began in earnest. RAF reconnaissance photographs and the King George V Dock at Southampton with similar gates to those at St Nazaire, [167 feet long, 54 feet high and 35 feet thick] were helpful in the preparations. The Demolition parties trained hard preparing charges to destroy the pumping machines and running at night carrying rucksacks filled with 90lbs of high explosives whilst the protection parties from No 2 Commando practised street fighting techniques.
The entire force assembled at Falmouth on 13 March, 1942. The final rehearsal did not go very well and further bad news arrived from photo reconnaissance, four German Möwe class frigates could be seen berthed close to the planned landing area with no intelligence as to how long they would stay.
The promised air support caused concern for Lt Col Newman. He wondered whether aerial bombing intended to distract the enemy’s attention from the Loire [and avoiding civilian casualties] could, in fact, achieve the opposite and suggest something else was occurring.
The force of 630 soldiers and sailors embarked on HMS Campbeltown and 16 Fairmile B Class launches, escorted by two Hunt Class destroyers. The wooden launches had been armed with machine guns and a newly fitted Oerlikon cannon but were very vulnerable to enemy fire, especially with 500g gallon petrol tanks strapped to their decks. The last two launches carried delayed action torpedoes to fire at the dock gates if HMS Campbeltown was sunk before it could ram the gates.
The force headed into the Atlantic, sailing in three columns to give the appearance of an anti-submarine force on a sweep. A German submarine was spotted on the second day and attacked by one of the escorts, HMS Tynedale.
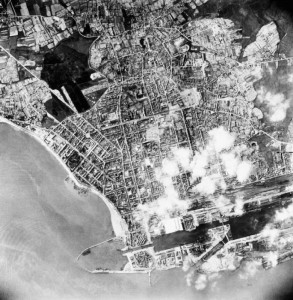
Another aerial view (left) of the dock at St Nazaire. The RAF Reconnaisance picture shortly before the raid of Operation Chariot shows Campbeltown’s target,.
Normandie Dock – seen top centre with a ship in situ. The Old Mole is the jetty visible pointing up in the top right
At 22:00 hours on Saturday 28 March, the convoy sighted the beacon of HMS Sturgeon, the submarine marking the mouth of the estuary and they proceeded towards the dock. 90 minutes later, the Whitley bombers designated for the diversionary air raid approached but due to the low level cloud, the bombing never really got underway and as Newman had feared, the Germans were alerted to other possible actions. Although initially they assumed a parachute attack was imminent, they soon noticed the small fleet approaching.
The harbour master confirmed no convoy was expected and at 01:20 hours, the German captain in charge of anti-aircraft defences sent a signal warning of the approaching vessels. By then, Campbeltown was within two miles of the dock gates and increased to full speed.
When a searchlight picked up Campbeltown, warning shots were fired but on Ryder’s instructions, signals were returned using codes discovered on the Commando raid on Vaagso, “Proceeding up harbour in accordance with orders” and a few precious minutes were gained.
Another exchange of signals followed and Ryder fired a red recognition flare but by this time, the enemy was convinced all was not well and began to fire. At 01:27 hours, Campbeltown sighted the gates, hauled down the German ensign and hoisted the British battle ensign and seven minutes later, rammed the dock gates.
Seven parties of Commandos charged ashore from Campbeltown. The priority was to destroy the German gun emplacements and Lieutenant Roderick’s group eliminated four within the first half-hour. The other assault team, led by Captain Roy, took out the guns on the roof of the pumping house and then formed a bridgehead to help the demolition parties withdraw. Lieutenant Chant was wounded before he disembarked from the Campbeltown but with his party, destroyed the pumping house, placing their charges the chamber 40 feet below ground. Lieutenant Smalley and his men eliminated the winding hut. The back-up squad, led by Lieutenant Burtinshaw, destroyed the massive outer caisson while Lieutenant Brett [who was shot in both legs before starting his task] and his men attacked the other side. Lieutenant Purdon and his men eliminated the second winding house. All the objectives were accomplished under intense fire and many men were wounded and killed.
The parties on the Motor Launches were not as successful. Only ML 457 managed to get her party ashore. Lieutenant Philip Walton and his men were to destroy the northern lock gate and its bridge. His party were subject to heavy enemy fire and managed to attach charges to two ships moored at the southern end of the basin but Lieutenant Walton was killed while laying explosives on the bridge.
The Commandos withdrew towards the old lock entrance and by 02:30 hours, they assembled at The Old Mole ready to withdraw. The launches were firing at the shore defences with Bren guns, Tommy-guns and the cannons. The enemy threw everything they could at them, and the Royal Navy losses were dreadful, seven MLs had been lost with their crews on the way in. Wreckage interspersed huge blazing pools of petrol, which could be clearly seen by the light of the searchlights and tracer trails crossing the sky.
Clearly, there was no way back by sea. Newman gathered his men and ordered them into the town of St Nazaire and from there to disperse and head for Spain. At 3:00 they were ready and fought their way through the warehouses by the submarine bay and to the bridge now known as The Bridge of Memories. Supporting the wounded, the Commandos charged the bridge. This inspirational action has become a symbol of the many acts of bravery at St Nazaire. As daylight fell, the small groups fighting on the streets had no time to find safe places to hide and were running out of ammunition. German roadblocks had sealed off the town and almost all the men who had made it ashore were captured. Just five men managed to return to England.
At 10:35, the Campbeltown finally exploded, to the relief of the prisoners. The force of the charges destroyed the caisson and seawater gushed into the empty dock. The remains of some 150 Germans aboard her at the time of the blast were found up to a mile away.
Over the following days, the Germans sent the prisoners to camps, the wounded to makeshift hospitals and started clearing debris from the dock while assessing the scale of the damage. The delayed action torpedoes fired by MTB 74 [which had brought up the rear of the convoy] suddenly exploded causing confusion and panic. The Germans fired indiscriminately, even at their own men.
The raid was undoubtedly a success for the British, despite the heavy casualties. Deemed ‘the greatest raid of all’; five Victoria Crosses were awarded. However, this success, and the Commando raid on Sark, led to Hitler’s grim ‘Commando Order‘, from then on any Special Forces soldier captured alive should be shot.
The terms of the Geneva Convention would not be extended to Commandos.


